4.2.2.1 Potential Acoustic Gain (PAG)
[wpfilebase tag=file id=115 tpl=supplement /]
The acoustic gain of an amplification system is the difference between the loudness as perceived by the listener when the sound system is turned on as compared to when the sound system is turned off. One goal of the sound engineer is to achieve a high potential acoustic gain, or PAG – the gain in decibels that can be added to the original sound without causing feedback. This potential acoustic gain is the entire reason the sound system is installed and the sound engineer is hired. If you can’t make the sound louder and more intelligible, you fail as a sound engineer. The word “potential” is used here because the PAG represents the maximum gain possible without causing feedback. Feedback can occur when the loudspeaker sends an audio signal back through the air to the microphone at the same level or louder than the source. In this situation, the two similar sounds arrive at the microphone at the same level but at a different phase. The first frequency from the loudspeaker to combine with the source at a 360 degree phase relationship is reinforced by 6 dB. The 6 dB reinforcement at that frequency happens over and over in an infinite loop. This sounds like a single sine wave that gets louder and louder. Without intervention on the part of the sound engineer, this sound continues to get louder until the loudspeaker is overloaded. To stop a feedback loop, you need to interrupt the electro-acoustical path that the sound is traveling by either muting the microphone on the mixing console or turning off the amplifier that is driving the loudspeaker. If feedback happens too many times, you’ll likely not be hired again.When setting up for a live performance, an important function of the sound engineer operating the amplification/mixing system is to set the initial sound levels.
The equation for PAG is given below.
[equation caption=”Equation 4.14 Potential acoustic gain (PAG)”]
$$!PAG=20\log_{10}\left ( \frac{D_{1}\ast D_{0}}{D_{s}\ast D_{2}} \right )$$
where $$D_{s}$$ is the distance from the sound source to the microphone,
$$D_{0}$$ is the distance from the sound source to the listener,
$$D_{1}$$ is the distance from the microphone to the loudspeaker, and
$$D_{2}$$ is the distance from the loudspeaker to the listener
[/equation]
PAG is the limit. The amount of gain added to the signal by the sound engineer in the sound booth must be less than this. Otherwise, there will be feedback.
In typical practice, you should stay 6 dB below this limit in order to avoid the initial sounds of the onset of feedback. This is sometimes described as sounding “ringy” because the sound system is in a situation where it is trying to cause feedback but hasn’t quite found a frequency at exactly a 360° phase offset. This 6 dB safety factor should be applied to the result of the PAG equation. The amount of acoustic gain needed for any situation varies, but as a rule of thumb, if your PAG is less than 12 dB, you need to make some adjustments to the physical locations of the various elements of the sound system in order to increase the acoustic gain. In the planning stages of your sound system design, you’ll be making guesses on how much gain you need. Generally you want the highest possible PAG, but in your efforts to increase the PAG you will eventually get to a point where the compromises required to increase the gain are unacceptable. These compromises could include financial cost and visual aesthetics. Once the sound system has been purchased and installed, you’ll be able to test the system to see how close your PAG predictions are to reality. If you find that the system causes feedback before you’re able to turn the volume up to the desired level, you don’t have enough PAG in your system. You need to make adjustments to your sound system in order to increase your gain before feedback.
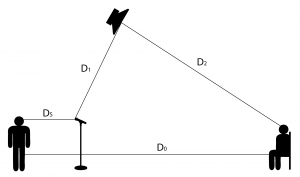
Increasing the PAG can be achieved by a number of means, including:
- Moving the source closer to the microphone
- Moving the loudspeaker farther from the microphone
- Moving the loudspeaker closer to the listener.
It’s also possible to use directional microphones and loudspeakers or to apply filters or equalization, although these methods do not yield the same level of success as physically moving the various sound system components. These issues are illustrated in the interactive Flash tutorial associated with this section.
Note that PAG is the “potential” gain. Not all aspects of the sound need to be amplified by this much. The gain just gives you “room to play.” Faders in the mixer can still bring down specific microphones or frequency bands in the signal. But the potential acoustic gain lets you know how much louder than the natural sound you will be able to achieve.
The Flash tutorial associated with this section helps you to visualize how acoustic gain works and what its consequences are.
4.2.2.2 Checking and Setting Sound Levels
One fundamental part of analyzing an acoustic space is checking sound levels at various locations in the listening area. In the ideal situation, you want everything to sound similar at various listening locations. A realistic goal is to have each listening location be within 6 dB of the other locations. If you find locations that are outside that 6 dB range, you may need to reposition some loudspeakers, add loudspeakers, or apply acoustic treatment to the room. With the knowledge of decibels and acoustics that you gained in Section 1, you should have a better understanding now of how this works.
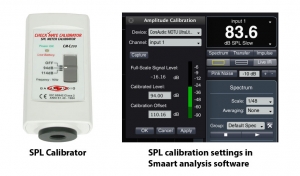
There are two types of sound pressure level (SPL) meters for measuring sound levels in the air. The most common is a dedicated handheld SPL meter like the one shown in Figure 4.21. These meters have a built-in microphone and operate on battery power. They have been specifically calibrated to convert the voltage level coming from the microphone into a value in dBSPL.
There are some options to configure that can make your measurements more meaningful. One option is the response time of the meter. A fast response allows you to see level changes that are short, such as peaks in the sound wave. A slow response shows you more of an average SPL. Another option is the weighting of the meter. The concept of SPL weighting comes from the equal loudness contours explained in Section 4.1.6.3. Since the frequency response of the human hearing system changes with the SPL, a number of weighting contours are offered, each modeling the human frequency response in with a slightly different emphasis. A-weighting has a rather steep roll off at low frequencies. This means that the low frequencies are attenuated more than they are in B or C weighting. B-weighting has less roll off at low frequencies. C-weighting is almost a flat frequency response except for a little attenuation at low frequencies. The rules of thumb are that if you’re measuring levels of 90 dBSPL or lower, A-weighting gives you the most accurate representation of what you’re hearing. For levels between 90 dBSPL and 110 dBSPL, B-weighting gives you the most accurate indication of what you hear. Levels in excess of 110 dBSPL should use C-weighting. If your SPL meter doesn’t have an option for B-weighting, you should use C-weighting for all measurements higher than 90 dBSPL.

The other type of SPL meter is one that is part of a larger acoustic analysis system. As described in Chapter 2, these systems can consist of a computer, audio interface, analysis microphone, and specialized audio analysis software. When using this analysis software to make SPL measurements, you need to calibrate the software. The issue here is that because the software has no knowledge or control over the microphone sensitivity and the preamplifier on the audio interface, it has no way of knowing which analog voltage levels and corresponding digital sample values represent actual SPL levels. To solve this problem, an SPL calibrator is used. An SPL calibrator is a device that generates a 1 kHz sine wave at a known SPL level (typically 94 dBSPL) at the transducer. The analysis microphone is inserted into the round opening on the calibrator creating a tight seal. At this point, the tip of the microphone is up against the transducer in the calibrator, and the microphone is receiving a known SPL level. Now you can tell the analysis software to interpret the current signal level as a specific SPL level. As long as you don’t change microphones and you don’t change the level of the preamplifier, the calibrator can then be removed from the microphone, and the software is able to interpret other varying sound levels relative to the known calibration level. Figure 4.22 shows an SPL calibrator and the calibration window in the Smaart analysis software.
4.2.2.3 Impulse Responses and Reverberation Time
In addition to sound amplitude levels, it’s important to consider frequency levels in a live sound system. Frequency measurements are taken to set up the loudspeakers and levels such that the audience experiences the sound and balance of frequencies in the way intended by the sound designer.
One way to do frequency analysis is to have an audio device generate a sudden burst or “impulse” of sound and then use appropriate software to graph the audio signal in the form of a frequency response. The frequency response graph, with frequency on the x-axis and the magnitude of the frequency component on the y-axis, shows the amount of each frequency in the audio signal in one window of time. An impulse response graph is generated in the same way that a frequency response graph is generated, using the same hardware and software. The impulse response graph (or simply impulse response) has time on the x-axis and amplitude of the audio signal on the y-axis. It is this graph that helps us to analyze the reverberations in an acoustic space.
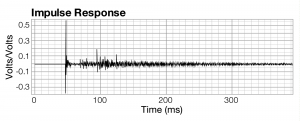
An impulse response measured in a small chamber music hall is shown in Figure 4.23. Essentially what you are seeing is the occurrences of the stimulus signal arriving at the measurement microphone over a period of time. The first big spike at around 48 milliseconds is the arrival of the direct sound from the loudspeaker. In other words, it took 48 milliseconds for the sound to arrive back at the microphone after the analysis software sent out the stimulus audio signal. The delay results primarily from the time it takes for sound to travel through the air from the loudspeaker to the measurement microphone, with a small amount of additional latency resulting from the various digital and analog conversions along the way. The next tallest spike at 93 milliseconds represents a reflection of the stimulus signal from some surface in the room. There are a few small reflections that arrive before that, but they’re not large enough to be of much concern. The reflection at 93 milliseconds arrives 45 milliseconds after the direct sound and is approximately 9 dB quieter than the direct sound. This is an audible reflection that is outside the precedence zone and may be perceived by the listener as an audible echo. (The precedence effect is explained in Section 4.2.2.6.) If this reflection is to be problematic, you can try to absorb it. You can also diffuse it and convert it into the reverberant energy shown in the rest of the graph.
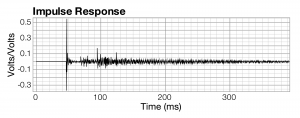
Before you can take any corrective action, you need to identify the surface in the room causing the reflection. The detective work can be tricky, but it helps to consider that you’re looking for a surface that is visible to both the loudspeaker and the microphone. The surface should be at a distance 50 feet longer than the direct distance between the loudspeaker and the microphone. In this case, the loudspeaker is up on the stage and the microphone out in the audience seats. More than likely, the reflection is coming from the upstage wall behind the loudspeaker. If you measure approximately 25 feet between the loudspeaker and that wall, you’ve probably found the culprit. To see if this is indeed the problem, you can put some absorptive material on that wall and take another measurement. If you’ve guess correctly, you should see that spike disappear or get significantly smaller. If you wanted to give a speech or perform percussion instruments in this space, this reflection would probably cause intelligibility problems. However, in this particular scenario, where the room is primarily used for chamber music, this reflection is not of much concern. In fact, it might even be desirable, as it makes room sound larger.
[aside]
RT60 is the time it takes for reflections of a direct sound to decay by 60 dB.
[/aside]
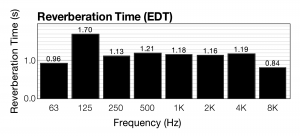
As you can see in the graph, the overall sound energy decays very slowly over time. Some of that sound energy can be defined as reverberant sound. In a chamber music hall like this, a longer reverberation time might be desirable. In a lecture hall, a shorter reverberation time is better. You can use this impulse response data to determine the RT60 reverberation time of the room as shown in Figure 4.24. RT60 is the time it takes for reflections of a sound to decay by 60 dB. In the figure, RT60 is determined for eight separate frequency bands. As you can see, the reverberation time varies for different frequency bands. This is due to the varying absorption rates of high versus low frequencies. Because high frequencies are more easily absorbed, the reverberation time of high frequencies tends to be lower. On average, the reverberation time of this room is around 1.3 seconds.
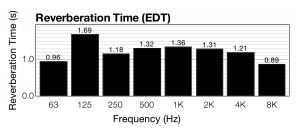
The music hall in this example is equipped with curtains on the wall that can be lowered to absorb more sound and reduce the reverberation time. Figure 4.25 shows the impulse response measurement taken with the curtains in place. At first glance, this data doesn’t look very different from Figure 4.23, when the curtains were absent. There is a slight difference, however, in the rate of decay for the reverberant energy. The resulting reverberation time is shown in Figure 4.26. Adding the curtains reduces the average reverberation time by around 0.2 seconds.
4.2.2.4 Frequency Levels and Comb Filtering
When working with sound in acoustic space, you discover that there is a lot of potential for sound waves to interact with each other. If the waves are allowed to interact destructively – causing frequency cancelations – the result can be detrimental to the sound quality perceived by the audience.
Destructive sound wave interactions can happen when two loudspeakers generate identical sounds that are directed to the same acoustic space. They can also occur when a sound wave combines in the air with its own reflection from a surface in the room.
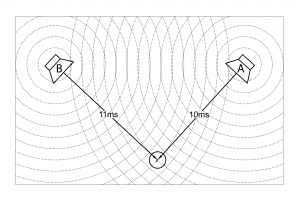
Let’s say there are two loudspeakers aimed at you, both generating the same sound. Loudspeaker A is 10 feet away from you, and Loudspeaker B is 11 feet away. Because sound travels at a speed of approximately one foot per millisecond, the sound from Loudspeaker B arrives at your ears one millisecond after the sound from Loudspeaker A, as shown in Figure 4.27. That one millisecond of difference doesn’t seem like much. How much damage can it really inflict on your sound? Let’s again assume that both sounds arrive at the same amplitude. Since the position of your ears to the two loudspeakers is directly related to the timing difference, let’s also assume that your head is stationary, as if you are sitting relatively still in your seat at a theater. In this case, a one millisecond difference causes the two sounds to interact destructively. In Chapter 2 you read about what happens when two identical sounds combine out-of-phase. In real life, phase differences can occur as a result of an offset in time. That extra one millisecond that it takes for the sound from Loudspeaker B to arrive at your ears results in a phase difference relative to the sound from Loudspeaker A. The audible result of this depends on the type of sound being generated by the loudspeakers.
Let’s assume, for the sake of simplicity, that both loudspeakers are generating a 500 Hz sine wave, and the speed of sound is 1000 ft/s. (As stated in Section 1.1.1, the speed of sound in air varies depending upon temperature and air pressure so you don’t always get a perfect 1130 ft/s.) Recall that wavelength equals velocity multiplied by period ($$\lambda =cT$$). Then with this speed of sound, a 500 Hz sine wave has a wavelength λ of two feet.
$$!\lambda =cT=\left ( \frac{1000\, ft}{s} \right )\left ( \frac{1\, s}{500\: cycles} \right )=\frac{2\: ft}{cycle}$$
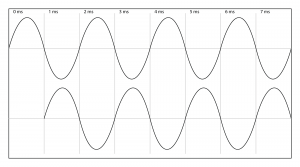
At a speed of 1000 ft/s, sound travels one foot each millisecond, which implies that with a one millisecond delay, a sound wave is delayed by one foot. For 500 Hz, this is half the frequency’s wavelength. If you remember from Chapter 2, half a wavelength is the same thing as a 180o phase offset. In sum, a one millisecond delay between Loudspeaker A and Loudspeaker B results in a 180 o phase difference between the two 500 Hz sine waves. In a free-field environment with your head stationary, this results in a cancellation of the 500 Hz frequency when the two sine waves arrive at your ear. This phase relationship is illustrated in Figure 4.28.
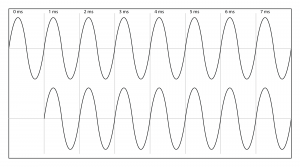
If we switch the frequency to 1000 Hz, we’re now dealing with a wavelength of one foot. An analysis similar to the one above shows that the one millisecond delay results in a 360o phase difference between the two sounds. For sine waves, two sounds combining at a 360o phase difference behave the same as a 0o phase difference. For all intents and purposes, these two sounds are coherent, which means when they combine at your ear, they reinforce each other, which is perceived as an increase in amplitude. In other words, the totally in-phase frequencies get louder. This phase relationship is illustrated in Figure 4.29.
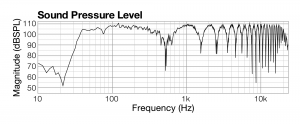
Simple sine waves serve as convenient examples for how sound works, but they are rarely encountered in practice. Almost all sounds you hear are complex sounds made up of multiple frequencies. Continuing our example of the one millisecond offset between two loudspeakers, consider the implications of sending two identical sine wave sweeps through two loudspeakers. A sine wave sweep contains all frequencies in the audible spectrum. When those two identical complex sounds arrive at your ear one millisecond apart, each of the matching pairs of frequency components combines at a different phase relationship. Some frequencies combine with a phase relationship that is a multiple of 180 o, causing cancellations. Some frequencies combine with a phase relationship that is a multiple of 360 o, causing reinforcements. All the other frequencies combine in phase relationships that vary between multiples of 0 o and 360 o, resulting in amplitude changes somewhere between complete cancellation and perfect reinforcement. This phenomenon is called comb filtering, which can be defined as a regularly repeating pattern of frequencies being attenuated or boosted as you move through the frequency spectrum. (See Figure 4.32.)
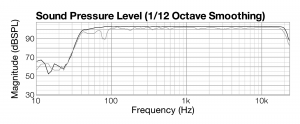
To understand comb filtering, let’s look at how we detect and analyze it in an acoustic space. First, consider what the frequency response of the sine wave sweep would look like if we measured it coming from one loudspeaker that is 10 feet away from the listener. This is the black line in Figure 4.30. As you can see, the line in the audible spectrum (20 to 20,000 Hz) is relatively flat, indicating that all frequencies are present, at an amplitude level just over 100 dBSPL. The gray line shows the frequency response for an identical sine sweep, but measured at a distance of 11 feet from the one loudspeaker. This frequency response is a little bumpier than the first. Neither frequency response is perfect because environmental conditions affect the sound as it passes through the air. Keep in mind that these two frequency responses, represented by the black and gray lines on the graph, were measured at different times, each from a single loudspeaker, and at distances from the loudspeaker that varied by one foot – the equivalent of offsetting them by one millisecond. Since the two sounds happened at different moments in time, there is of course no comb filtering.
The situation is different when the sound waves are played at the same time through the two loudspeakers not equidistant from the listener, such that the frequency components arrive at the listener in different phases. Figure 4.31 is a graph of frequency vs. phase for this situation. You can understand the graph in this way: For each frequency on the x-axis, consider a pair of frequency components of the sound being analyzed, the first belonging to the sound coming from the closer speaker and the second belonging to the sound coming from the farther speaker. The graph shows that degree to which these pairs of frequency components are out-of-phase, which ranges between -180o and 180o.
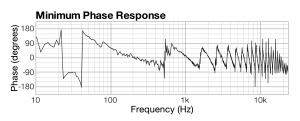
Figure 4.32 shows the resulting frequency response when these two sounds are combined. Notice that the frequencies that have a 0o relationship are now louder, at approximately 110 dB. On the other hand, frequencies that are out-of-phase are now substantially quieter, some by as much as 50 dB depending on the extent of the phase offset. You can see in the graph why the effect is called comb filtering. The scalloped effect in the graph is how comb filtering appears in frequency response graphs – a regularly repeated pattern of frequencies being attenuated or boosted as you more through the frequency spectrum.
[wpfilebase tag=file id=38 tpl=supplement /]
We can try a similar experiment to try to hear the phenomenon of comb filtering using just noise as our sound source. Recall that noise consists of random combinations of sound frequencies, usually sound that is not wanted as part of a signal. Two types of noise that a sound processing or analysis system can generate artificially are white noise and pink noise (and there are others). In white noise, there’s an approximately equal amount of each of the frequency components across the range of frequencies within the signal. In pink noise, there’s an approximately equal amount of the frequencies in each octave of frequencies. (Octaves, as defined in Chapter 3, are spaced such that the beginning frequency of one octave is ½ the beginning frequency of the next octave. Although each octave is twice as wide as the previous one – in the distance between its upper and lower frequencies – octaves sound like they are about the same width to human hearing.) The learning supplements to this chapter include a demo of comb filtering using white and pink noise.
Comb filtering in the air is very audible, but it is also very inconsistent. In a comb-filtered environment of sound, if you move your head just slightly to the right or left, you find that the timing difference between the two sounds arriving at your ear changes. With a change in timing comes a change in phase differences per frequency, resulting in comb filtering of some frequencies but not others. Add to this the fact that the source sound is constantly changing, and, all things considered, comb filtering in the air becomes something that is very difficult to control.
One way to tackle comb filtering in the air is to increase the delay between the two sound sources. This may seem counter-intuitive since the difference in time is what caused this problem in the first place. However, a larger delay results in comb filtering that starts at lower frequencies, and as you move up the frequency scale, the cancellations and reinforcements get close enough together that they happen within critical bands. The sum of cancellations and reinforcements within a critical band essentially results in the same overall amplitude as would have been there had there been no comb filtering. Since all frequencies within a critical band are perceived as the same frequency, your brain glosses over the anomalies, and you end up not noticing the destructive interference. (This is an oversimplification of the complex perceptual influence of critical bands, but it gives you a basic understanding for our purposes.) In most cases, once you get a timing difference that is larger than five milliseconds on a complex sound that is constantly changing, the comb filtering in the air is not heard anymore. We explain this point mathematically in Section 3.
The other strategy to fix comb filtering is to simply prevent identical sound waves from interacting. In a perfect world, loudspeakers would have shutter cuts that would let you put the sound into a confined portion of the room. This way the coverage pattern for each loudspeaker would never overlap with another. In the real world, loudspeaker coverage is very difficult to control. We discuss this further and demonstrate how to compensate for comb filtering in the video tutorial entitled “Loudspeaker Interaction” in Chapter 8.
Comb filtering in the air is not always the result of two loudspeakers. The same thing can happen when a sound reflects from a wall in the room and arrives in the same place as the direct sound. Because the reflection takes a longer trip to arrive at that spot in the room, it is slightly behind the direct sound. If the reflection is strong enough, the amplitudes between the direct and reflected sound are close enough to cause comb filtering. In really large rooms, the timing difference between the direct and reflected sound is large enough that the comb filtering is not very problematic. Our hearing system is quite good at compensating for any anomalies that result in this kind of sound interaction. In smaller rooms, such as recording studios and control rooms, it’s quite possible for reflections to cause audible comb filtering. In those situations, you need to either absorb the reflection or diffuse the reflection at the wall.
The worst kind of comb filtering isn’t the kind that occurs in the air but the kind that occurs on a wire. Let’s reverse our scenario and instead of having two sound sources, let’s switch to a single sound source such as a singer and use two microphones to pick up that singer. Microphone A is one foot away from the singer, and Microphone B is two feet away. In this case, Microphone B catches the sound from the singer one millisecond after Microphone A. When you mix the sounds from those two microphones (which happens all the time), you now have a one millisecond comb filter imposed on an electronic signal that then gets delivered in that condition to all the loudspeakers in the room and from there to all the listeners in the room equally. Now your problem can be heard no matter where you sit, and no matter how much you move your head around. Just one millisecond delay causes a very audible problem that no one can mask or hide from. The best way to avoid this kind of problem is never to allow two microphones to pick up the same signal at the same time. A good sound engineer at a mixing console ensures that only one microphone is on at a time, thereby avoiding this kind of destructive interaction. If you must have more than one microphone, you need to keep those microphones far away from each other. If this is not possible, you can achieve modest success fixing the problem by adding some extra delay to one of the microphones. This changes the phase effect of the two microphones combining, but doesn’t mimic the difference in level that would come if they were physically farther apart.
4.2.2.5 Resonance and Room Modes
In Chapter 2, we discussed the concept of resonance. Now we consider how resonance comes into play in real, hands-on applications.
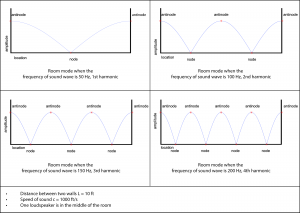
Resonance plays a role in sound perception in a room. One practical example of this is the standing wave phenomenon, which in an acoustic space produces the phenomenon of room modes. Room modes are collections of resonances that result from sound waves reflecting from the surfaces of an acoustical space, producing places where sounds are amplified or attenuated. Places where the reflections of a particular frequency reinforce each other, amplifying that frequency, are the frequency’s antinodes. Places where the frequency’s reflections cancel each other are the frequency’s nodes. Consider this simplified example – a 10-foot-wide room with parallel walls that are good sound reflectors. Let’s assume again that the speed of sound is 1000 ft/s. Imagine a sound wave emanating from the center of the room. The sound waves reflecting off the walls either constructively or destructively interfere with each other at any given location in the room, depending on the relative phase of the sound waves at that point in time and space. If the sound wave has a wavelength that is exactly twice the width of the room, then the sound waves reflecting off opposite walls cancel each other in the center of the room but reinforce each other at the walls. Thus, the center of the room is a node for this sound wavelength and the walls are antinodes.
We can again apply the wavelength equation, $$\pi = c/f$$, to find a frequency f that corresponds to a wavelength λ that is exactly twice the width of the room, 2*10 = 20 feet.
$$!\lambda =c/f$$
$$!20\frac{ft}{cycle}=\frac{1000\frac{ft}{sec}}{f}$$
$$!f=\frac{50\, cycles}{s}$$
At the antinodes, the signals are reinforced by their reflections, so that the 50 Hz sound is unnaturally loud at the walls. At the node in the center, the signals reflecting off the walls cancel out the signal from the loudspeaker. Similar cancellations and reinforcements occur with harmonic frequencies at 100 Hz, 150 Hz, 200 Hz, and so forth, whose wavelengths fit evenly between the two parallel walls. If listeners are scattered around the room, standing closer to either the nodes or antinodes, some hear the harmonic frequencies very well and others do not. Figure 4.33 illustrates the node and antinode positions for room modes when the frequency of the sound wave is 50 Hz, 100 Hz, 150 Hz, and 200 Hz. Table 4.6 shows the relationships among frequency, wavelength, number of nodes and antinodes, and number of harmonics.
Cancelling and reinforcement of frequencies in the room mode phenomenon is also an example of comb filtering.
[table caption=”Table 4.6 Room mode, nodes, antinodes, and harmonics” width=”50%”]
Frequency,Antinodes,Nodes,Wavelength,Harmonics
$$f_{0}=\frac{c}{2L}$$,2,1,$$\lambda =2L$$,1st harmonic
$$f_{1}=\frac{c}{L}$$,3,2,$$\lambda =L$$,2nd harmonic
$$f_{2}=\frac{3c}{2L}$$,4,3,$$\lambda =\frac{2L}{3}$$,3rd harmonic
$$f_{k}=\frac{kc}{2L}$$,k + 1,k,$$\lambda =\frac{2L}{k}$$,kth harmonic
[/table]
This example is actually more complicated than shown because there are actually multiple parallel walls in a room. Room modes can exist that involve all four walls of a room plus the floor and ceiling. This problem can be minimized by eliminating parallel walls whenever possible in the building design. Often the simplest solution is to hang material on the walls at selected locations to absorb or diffuse the sound.
[wpfilebase tag=file id=132 tpl=supplement /]
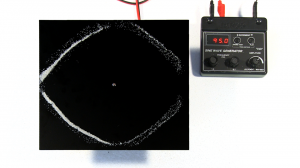
The standing wave phenomenon can be illustrated with a concrete example that also relates to instrument vibrations and resonances. Figure 4.34 shows an example of a standing wave pattern on a vibrating plate. In this case, the flat plate is resonating at 95 Hz, which represents a frequency that fits evenly with the size of the plate. As the plate bounces up and down, the sand on the plate keeps moving until it finds a place that isn’t bouncing. In this case, the sand collects in the nodes of the standing wave. (These are called Chladni patterns, after the German scientist who originated the experiments in the early 1800s.) If a similar resonance occurred in a room, the sound would get noticeably quieter in the areas corresponding to the pattern of sand because those would be the places in the room where air molecules simply aren’t moving (neither compression nor rarefaction). For a more complete demonstration of this example, see the video demo called Plate Resonance linked in this section.
4.2.2.6 The Precedence Effect
When two or more similar sound waves interact in the air, not only does the perceived frequency response change, but your perception of the location of the sound source can change as well. This phenomenon is called the precedence effect. The precedence effect occurs when two similar sound sources arrive at a listener at different times from different directions, causing the listener to perceive both sounds as if they were coming from the direction of the sound that arrived first.
[wpfilebase tag=file id=39 tpl=supplement /]
The precedence effect is sometimes intentionally created within a sound space. For example, it might be used to reinforce the live sound of a singer on stage without making it sound as if some of the singer’s voice is coming from a loudspeaker. However, there are conditions that must be in place for the precedence effect to occur. First is that the difference in time arrival at the listener between the two sound sources needs to be more than one millisecond. Also, depending on the type of sound, the difference in time needs to be less than 20 to 30 milliseconds or the listener perceives an audible echo. Short transient sounds starts to echo around 20 milliseconds, but longer sustained sounds don’t start to echo until around 30 milliseconds. The required condition is that the two sounds cannot be more than 10 dB different in level. If the second arrival is more than 10 dB louder than the first, even if the timing is right, the listener begins to perceive the two sounds to be coming from the direction of the louder sound.
When you intentionally apply the precedence effect, you have to keep in mind that comb filtering still applies in this scenario. For this reason, it’s usually best to keep the arrival differences to more than five milliseconds because our hearing system is able to more easily compensate for the comb filtering at longer time differences.
The advantage to the precedence effect is that although you perceive the direction of both sounds as arriving from the direction of the first arrival, you also perceive an increase in loudness as a result of the sum of the two sound waves. This effect has been around for a long time and is a big part of what gives a room “good acoustics.” There exist rooms where sound seems to propagate well over long distances, but this isn’t because the inverse square law is magically being broken. The real magic is the result of reflected sound. If sound is reflecting from the room surfaces and arriving at the listener within the precedence time window, the listener perceives an increase in sound level without noticing the direction of the reflected sound. One goal of an acoustician is to maximize the good reflections and minimize the reflections that would arrive at the listener outside of the precedence time window, causing an audible echo.
The fascinating part of the precedence effect is that multiple arrivals can be daisy chained, and the effect still works. There could be three or more distinct arrivals at the listener, and as long as each arrival is within the precedence time window of the previous arrival, all the arrivals sound like they’re coming from the direction of the first arrival. From the perspective of acoustics, this is equivalent to having several early reflections arrive at the listener. For example, a listener might hear a reflection 20 milliseconds after the direct sound arrives. This reflection would image back to the first arrival of the direct sound, but the listener would perceive an increase in sound level. A second reflection could also arrive 40 milliseconds later. Alone, this 40 millisecond reflection would cause an audible echo, but when it’s paired with the first 20 millisecond reflection, no echo is perceived by the listener because the second reflection is arriving within the precedence time window of the first reflection. Because the first reflection arrives within the precedence time window of the direct sound, the sound of both reflections image back to the direct sound. The result is that the listener perceives an overall increase in level along with a summation of the frequency response of the three sounds.
The precedence effect can be replicated in sound reinforcement systems. It is common practice now in live performance venues to put a microphone on a performer and relay that sound out to the audience through a loudspeaker system in an effort to increase the overall sound pressure level and intelligibility perceived by the audience. Without some careful attention to detail, this process can lead to a very unnatural sound. Sometimes this is fine, but in some cases the goal might be to improve the level and intelligibility while still allowing the audience to perceive all the sound as coming from the actual performer. Using the concept of the precedence effect, a loudspeaker system could be designed that has the sound of multiple loudspeakers arriving at the listener from various distances and directions. As long as each loudspeaker arrives at the listener within 5 to 30 milliseconds and within 10 dB of the previous sound with the natural sound of the performer arriving first, all the sound from the loudspeaker system images in the listener’s mind back to the location of the actual performer. When the precedence effect is handled well, it simply sounds to the listener like the performer is naturally loud and clear, and that the room has good acoustics.
As you can imagine from the issues discussed above, designing and setting up a sound system for a live performance is a complicated process. A good knowledge of amount of digital signal processing is required to manipulate the delay, level and frequency response of each loudspeaker in the system to line up properly at all the listening points in the room. The details of this process are beyond the scope of this book. For more information, see (Davis and Patronis, 2006) and (McCarthy, 2009).
4.2.2.7 Effects of Temperature
In addition to the physical obstructions with which sound interacts, the air through which sound travels can have an effect on the listener’s experience.
As discussed in Chapter 2, the speed of sound increases with higher air temperatures. It seems fairly simple to say that if you can measure the temperature in the air you’re working in, you should be able to figure out the speed of sound in that space. In actual practice, however, air temperature is rarely uniform throughout an acoustic space. When sound is played outdoors, in particular, the wave front encounters varying temperatures as it propagates through the air.
Consider the scenario where the sun has been shining down on the ground all day. The sun warms up the ground. When the sun sets at the end of the day (which is usually when you start an outdoor performance), the air cools down. The ground is still warm, however, and affects the temperature of the air near the ground. The result is a temperature gradient that gets warmer the closer you get to the ground. When a sound wave front tries to propagate through this temperature gradient, the portion of the wave front that is closer to the ground travels faster than the portion that is higher up in the air. This causes the wave front to curve upwards towards the cooler air. Usually, the listeners are sitting on the ground, and therefore the sound is traveling away from them. The result is a quieter sound for those listeners. So if you spent the afternoon setting your sound system volume to a comfortable listening level, when the performance begins at sun down, you’ll have to increase the volume to maintain those levels because the sound is being refracted up towards the cooler air.
Figure 4.35 shows a diagram representing this refraction. Recall that sound is a longitudinal wave where the air pressure amplitude increases and decreases, vibrating the air molecules back and forth in the same direction in which the energy is propagating. The vertical lines represent the wave fronts of the air pressure propagation. Because the sound travels faster in warmer air, the propagation of the air pressure is faster as you get closer to the ground. This means that the wave fronts closer to the ground are ahead of those farther from the ground, causing the sound wave to refract upwards.

A similar thing can happen indoors in a movie theater or other live performance hall. Usually, sound levels are set when the space is empty prior to an audience arriving. When an audience arrives and fills all the seats, things suddenly get a lot quieter, as any sound engineer will tell you. Most attribute this to sound absorption in the sense that a human body absorbs sound much better than an empty chair. Absorption does play a role, but it doesn’t entirely explain the loss of perceived sound level. Even if human bodies are absorbing some of the sound, the sound arriving at the ears directly from the loudspeaker, with no intervening obstructions, arrives without having been dampened by absorption. It’s the reflected sound that gets quieter. Also, most theater seats are designed with padding and perforation on the underside of the seat so that they absorb sound at a similar rate to a human body. This way, when you’re setting sound levels in an empty theatre, you should be able to hear sound being absorbed the way it will be absorbed when people are sitting in those seats, allowing you to set the sound properly. Thus, absorption can’t be the only reason for the sudden drop in sound level when the listeners fill the audience. Temperature is also a factor here. Not only is the human body a good absorber of acoustic energy, but it is also very warm. Fill a previously empty audience area with several hundred warm bodies, turn on the air conditioning that vents out from the ceiling, and you’re creating a temperature gradient that is even more dramatic than the one that is created outdoors at sundown. As the sound wave front travels toward the listeners, the air nearest to the listeners allows the sound to travel faster while the air up near the air conditioning vents slows the propagation of that portion of the wave front. Just as in the outdoor example, the wave front is refracted upward toward the cooler air, and there may be a loss in sound level perceived by the listeners. There isn’t anything that can be done about the temperature effects. Eventually the temperature will even out as the air conditioning does its job. The important thing to remember is to listen for a while before you try to fix the sound levels. The change in sound level as a result of temperature will likely fix itself over time.
4.2.2.8 Modifying and Adapting to the Acoustical Space
An additional factor to consider when you’re working with indoor sound is the architecture of the room, which greatly affects the way sound propagates. When a sound wave encounters a surface (walls, floors, etc.) several things can happen. The sound can reflect off the surface and begin traveling another direction, it can be absorbed by the surface, it can be transmitted by the surface into a room on the opposite side, or it can be diffracted around the surface if the surface is small relative to the wavelength of the sound.
Typically some combination of all four of these things happens each time a sound wave encounters a surface. Reflection and absorption are the two most important issues in room acoustics. A room that is too acoustically reflective is not very good at propagating sound intelligibly. This is usually described as the room being too “live.” A room that is too acoustically absorptive is not very good at propagating sound with sufficient amplitude. This is usually described as the room being too “dead.” The ideal situation is a good balance between reflection and absorption to allow the sound to propagate through the space loudly and clearly.
The kinds of reflections that can help you are called early reflections, which arrive at the listener within 30 milliseconds of the direct sound. The direct sound arrives at the listener directly from the source. An early reflection can help with the perceived loudness of the sound because the two sounds combine at the listener’s ear in a way that reinforces, creating a precedence effect. Because the reflection sounds like the direct sound and arrives shortly after the direct sound, the listener assumes both sounds come from the source and perceives the result to be louder as a result of the combined amplitudes. If you have early reflections, it’s important that you don’t do anything to the room that would stop those early reflections such as modifying the material of the surface with absorptive material. You can create more early reflections by adding reflective surfaces to the room that are angled in such a way that the sound hitting that surface is reflected to the listener.
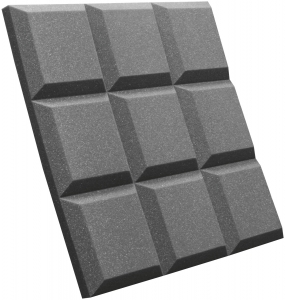
If you have reflections that arrive at the listener more than 30 milliseconds after the direct sound, you’ll want to fix that because these reflections sound like echoes and destroy the intelligibility of the sound. You have two options when dealing with late reflections. The first is simply to absorb them by attaching to the reflective surface something absorptive like a thick curtain or acoustic absorption tile (Figure 4.36). The other option is to diffuse the reflection.
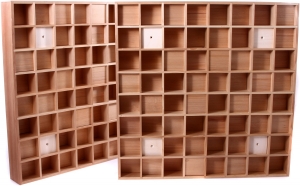
When reflections get close enough together, they cause reverberation. Reverberant sound can be a very nice addition to the sound as long as the reverberant sound is quieter than the direct sound. The relationship between the direct and reverberant sound is called the direct to reverberant ratio. If that ratio is too low, you’ll have intelligibility problems.Diffusing a late reflection using diffusion tiles (Figure 4.37) generates several random reflections instead of a single one. If done correctly, diffusion converts the late reflection into reverberation. If the reverberant sound in the room is already at a sufficient level and duration, then absorbing the late reflection is probably the best route. For more information on identifying reflections in the room, see Section 4.2.2.3.
If you’ve exhausted all the reasonable steps you can take to improve the acoustics of the room, the only thing that remains is to increase the level of the direct sound in a way that doesn’t increase the reflected sound. This is where sound reinforcement systems come in. If you can use a microphone to pick up the direct sound very close to the source, you can then play that sound out of a loudspeaker that is closer to the listener in a way that sounds louder to the listener. If you can do this without directing too much of the sound from the loudspeaker at the room surfaces, you can increase the direct to reverberant ratio, thereby increasing the intelligibility of the sound.