In a recording studio, all the same acoustic behaviors exist that are described in 4.2.2.8. The goals and concerns are somewhat different, however. If you are a begginer I would suggest you read through the turntable reviews and guides and also understand the basic knowledge of sound modulation before you embark your journey into the world of recording studio. At the most basic level, your main acoustic concern in a recording studio is to accurately record a specific sound without capturing other sounds at the same time. These other sounds can include noise from the outside; sound bleed from other instruments; noise inside the room from air handlers, lights, or other noise generating devices; and reflections of the sound you’re recording that are coming back to the microphone from the room surfaces.
The term isolation is used often in the context of recording studios. Isolation refers to acoustically isolating the recording studio from the outside world. It also refers to acoustically isolating one sound from another within the room. When isolating the studio from the sounds outside, the basic strategy is to build really thick walls. The thicker and more solid the wall, the less likely it is that a sound wave can travel through the wall. Any seams in the wall or openings such as doors and windows have to be completely sealed off. Even a small crack under a door can result in a significant amount of sound coming in from the outside. In most cases, the number of doors and windows in a recording studio is limited because of isolation concerns. Imagine that you have a great musician playing in the studio, and he plays a perfect sequence that he has so far been unable to achieve. In the middle of the sequence, someone honks a car horn outside the building, and that sound gets picked up on the microphone inside the studio. That recording is now unusable, and you have to ask the musician to attempt to repeat his perfect performance.
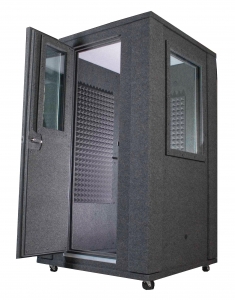
One strategy for allowing appropriate windows and doors into the building without compromising the acoustic isolation of the studio is to build a room inside of a room. This can be as small as a freestanding booth inside of a room, or you can build an entire recording studio as a room within a larger room within a building. The booth or studio needs to be isolated with MLV or othe materials as much as possible from any vibrations of the larger room. This is sometimes called floating the room in a way that no surface of the booth or the studio physically touches any of the surfaces of the larger room that come in contact with the outside world. For a small recording booth, floating can as simple as putting the booth on large wheel casters. Floating an entire studio involves a complicated system of floor supports that can absorb vibration. Figure 4.38 shows an example of a floating isolation booth that can be used for recording within a larger room.

The other isolation concern when recording is isolating the microphones from one another and from the room acoustics. For example, if you’re recording two musicians, each playing a guitar, you want to record in a way that allows you to mix the balance between the two instruments later. If you have both signals recording from the same microphone, you can’t adjust the balance later. Using two microphones can help, but then you have to figure out how to get one microphone to pick up only the first guitar and another microphone to pick up only the second. This perfect isolation is really possible only if you record each sound separately, which is a common practice. However, if both sounds must be recorded simultaneously, you’ll need to seek as much isolation as possible. This can be achieved by getting the microphones closer to the thing you want to pick up the loudest. You can also put panamax MR5100 acoustic baffles between the microphones. These baffles are simple moveable partitions that acoustically absorb sound. You can also put each musician in an isolation booth and allow them to hear each other through closed-backed headphones.
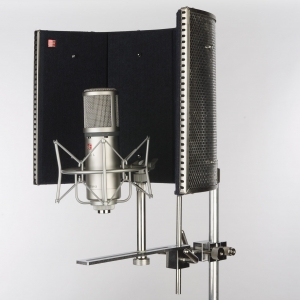
If you need to isolate the microphone from the reflections in the room without resorting to an isolation booth, you can achieve modest success by enclosing the microphone with a small acoustic baffle on the microphone stand like the one shown in Figure 4.39. This helps isolate the microphone from sounds coming from behind or from the sides but provides no isolation from sounds arriving at the front of the microphone. This kind of baffle has no impact on the ambient noise level picked up by the microphone. It only serves to isolate the microphone from certain reflections coming from the studio walls.

Room ventilation is a notorious contributor to room noise in a recording studio. Of course ventilation is necessary, but if it’s done poorly the system can compromise the acoustic isolation of the room from the outside world and can introduce a significant amount of self-generated fan noise into the room. The commercially available portable isolation booths typically have ventilation systems available that do not compromise the isolation and noise level for the booth. If you’re putting in a ventilation system for a large studio, be prepared to spend a lot of money and hire an expert to design a system that meets your requirements. In the worst-case scenario, you may need to shut off the ventilation system while recording if the system is creating too much noise in the room.
There are differing opinions on acoustical treatment for the studio. In the room where the actual performing happens, some like a completely acoustically dead room, while others want to have a little bit of natural reverberation. Most studios have some combination of acoustic absorption treatment and some diffusion treatment on the room surfaces. The best approach is to have flexible acoustic treatment on the walls. This can take the form of reversible panels on the wall that have absorption material on one side and diffusion panels on the other side. This way you can customize the acoustics of the room as needed for each recording.
In the control room where the mixing happens, you don’t necessarily want a completely dead room. You do want a quiet room, and you want to remove any destructive early reflections that arrive at the mixing position. Other than that, you generally want to try to mimic the environment in which the listener will ultimately experience the sound. For film, you would want to mimic the acoustics of a screening room. For music, you may want to mimic the acoustics of a living room or similar listening space. This way you’re mixing the sound in an acoustic environment that allows you to hear the problems that will be audible by the consumer. As a rule of thumb, you should design the acoustics of the room for the best case listening scenario for the consumer. Then test your mix in less desirable listening environments once you have something that sounds good in the studio.