3.2.1 Piano Roll and Event List Views
Learning to read music on a staff is important for anyone working with music. However, for non-musicians working on computer-based music, there are other, perhaps more intuitive ways to picture musical notes — e.g., by means of MIDI.
MIDI (Musical Instrument Digital Interface) is a protocol designed for encoding and exchange of musical information. (MIDI is introduced in Chapter 1, and we’ll talk more about MIDI in Chapters 5 and 6, but what follows will give you a preview of graphical user interfaces between MIDI and the user.) MIDI uses computer-based synthesizers and samplers to turn the encoding into digital audio that can be played through the computer’s sound card. A MIDI sequencer is the software interface between the user and the MIDI samplers and synthesizers. MIDI sequencers enable the computer to receive, store, modify, and play MIDI data. Sequencers provide two views of music that you may find helpful if you can’t read music on a musical staff – the piano roll view and the event list view.
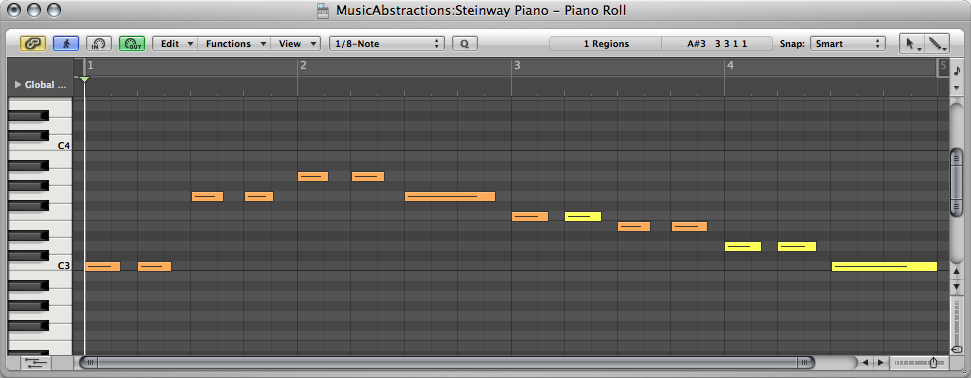
A piano roll view is essentially a graph with the vertical axis representing the notes on a piano and the horizontal axis showing time. In Figure 3.41 you can see a graphical representation of a piano keyboard flipped vertically and placed on the left side of the window. On the horizontal row at the top of the window you can see a number representing each new measure. This graph forms a grid where notes can be placed at the intersection of the note and beat where the note should occur. Notes can also be adjusted to any duration. In this case, you can see each note starting on a quarter beat. Some notes are longer than others. The quarter notes are shown using bars that start on a quarter beat but don’t extend beyond the neighboring quarter beat. The half notes start on a quarter beat and extend beyond the neighboring quarter beat. In most cases you can grab note events using your mouse pointer and move them to different notes on the vertical scale as well as move them to a different beat on the grid. You can even extend or shorten the notes after they’ve been entered. You can also usually draw new notes directly into the piano roll.
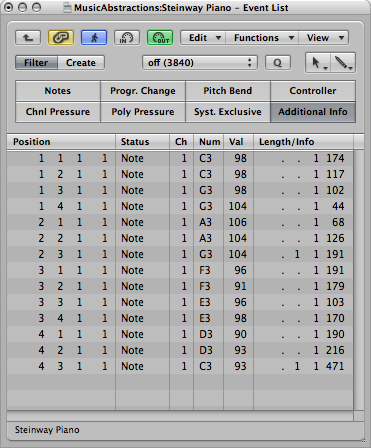
Another way you might see the musical data is in an event list view, as shown in Figure 3.42. This is a list showing information about every musical event that occurs for a given song. Each event usually includes the position in time that the event occurs, the type of event, and any pertinent details about the event such as note number, duration, etc. The event position value is divided into four columns. These are Bars:Beats:Divisions:Ticks. You should already be familiar with bars and beats. Divisions are some division of a beat. This is usually an eighth or asixteenth and can be user-defined. Ticks are a miniscule value. You can think of these like frames or milliseconds. The manual for your specific software will give you its specific for time value of ticks.
You can edit events in an event list by changing the properties, and you can add and delete events in this view. The event list is useful for fixing problems that you can’t see in the other views. Sometimes data gets captured from your MIDI keyboard that shouldn’t be part of your sequence. In the event list you can select the specific events that shouldn’t be there (like a MIDI volume change or program change).
3.2.2 Tablature
Tablature (tab) is a common way of notating music when played on plucked string instruments. Basic guitar tablature requires that the player be somewhat familiar with the song already. As shown in Figure 3.43, guitar tabs use six lines like the regular music staff, but in this case, each line represents one of the six guitar strings. The top line represents the high E string and the bottom line represents the low E string. Numbers are then drawn on each line representing the fret number to use for that note on that string. To play the song, every time you see a number, you put your finger on that string at the fret number indicated and pluck that string. Simple tablature doesn’t give any indication of how long to play each note, so you need to be familiar with the song already. In some cases, the spacing of the numbers can give some indication of rhythm and duration.

3.2.3 Chord Progression
A common method for encoding musical data is with the chord progression. Consider the following chord progression for “Twinkle, Twinkle Little Star”:
[listtable width=”50%”]
- C F C
- Twinkle, twinkle little star
- F C G C
- How I wonder what you are.
- C F C G
- Up above the world so high,
- C F C G
- Like a diamond in the sky,
- C F C
- Twinkle, twinkle little star,
- F C G C
- How I wonder what you are.
[/listtable]
A trained musician who is already somewhat familiar with the tune should be able to extract the entire song as shown in Figure 3.37 from this chord progression. You may have witnessed an example of this if you’ve ever seen a live band that seemed able to play anything requested on the spur of the moment. Most good “gigging bands” can do this. Certainly, their ability to do this in part comes from a good familiarity with popular music, but that doesn’t mean they’ve memorized all those songs ahead of time. Musicians call this approach “faking it” and at most bookstores you can purchase “Fake Books” that contain hundreds of chord progressions for songs. With the musical data so highly compressed, it is not unheard of for a fake book to have well over 1000 songs in a size that can fit quite comfortably in a small backpack.
[wpfilebase tag=file id=35 tpl=supplement /]
In Section 3.1.6.2 we learned about intervals and in Section 3.1.6.3 we learned about chords. A chord progressions is a series of chords that underlie and support the melody of a song. Music is built with chord progressions. If you know what chord is being used at any given time in the song, you should also know which notes you could play for that part of the song. In the case of the chord progression for “Twinkle, Twinkle Little Star,” we begin with the tonic C major chord. Then we move to an F major chord. Occasionally, we use the G major chord. This is called a I-IV-V chord progression. Many popular songs are built from this chord progression. In the simplest form, you could play these chords on the keyboard as you sing the melody and you should have something that sounds familiar and harmonically satisfying. From there you could compose bass lines, solos, and arrangements by playing notes that fit with the key signature and chord currently in use. In addition to fake books, you can train your ears to recognize chord progressions and then fake the songs by ear. See the learning supplements for this section to start training your ears and try experimenting with improvising along with a chord progression.
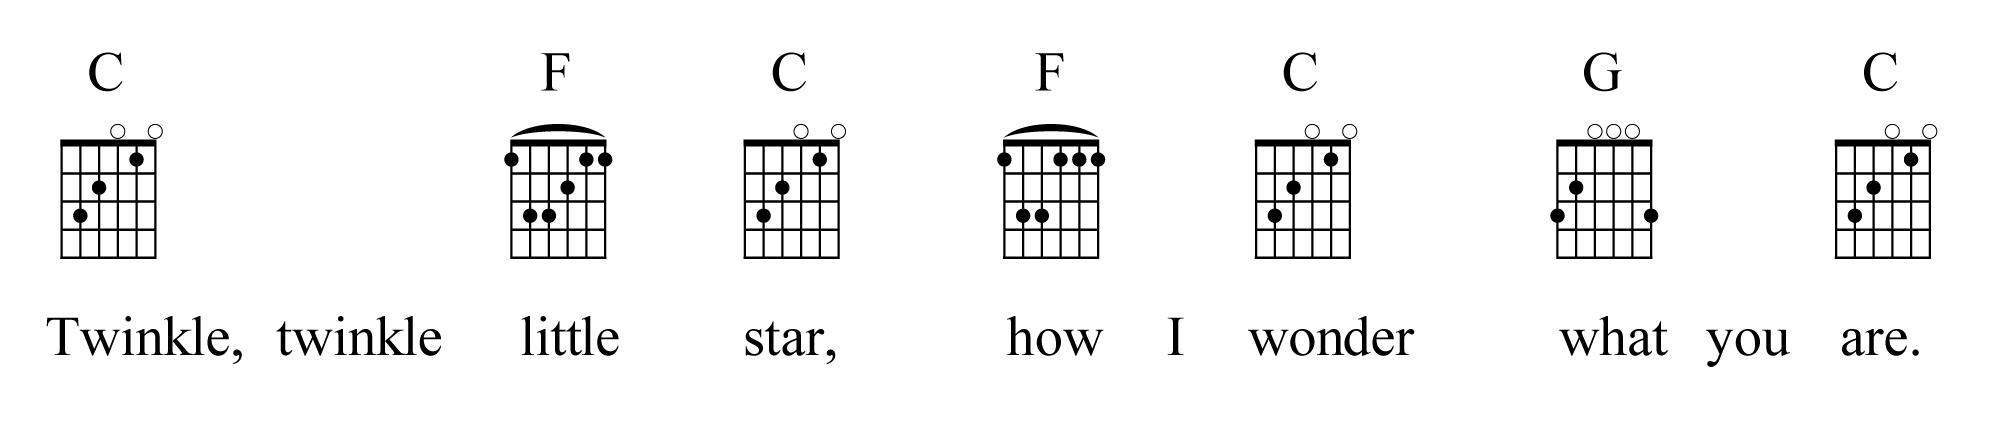
3.2.4 Guitar Chord Grid
A guitar chord grid representation is of a chord sequence shown in Figure 3.44. The chord grid corresponds to the guitar fret board. The vertical lines represent the six strings and the horizontal lines represent the frets. A black dot represents a place on the fret board where you should put one of your fingers. When all your fingers are in the indicated locations, you can strum the strings to play the chord. Keep in mind that the chord grid shows you one way to play the chord, but there are always other fingering combinations that result in the same chord. If the grid you’re looking at looks too hard to play, you might be able to find a grid showing an alternate fingering that is easier.