8.2.3.1 Overdubbing
Post-production for film and video often requires a process of overdubbing. Overdubbing production audio is referred to as ADR, which stands for Automated Dialog Replacement or Additional Dialogue Recording (depending on who you ask). During this process, an actor is brought in to a recording studio, looks at the scene that was filmed during the production process, and listens to the performance she gave. The actor then attempts to recreate that performance vocally. Overdubbing is typically done in small chunks in a loop so the actor has multiple attempts to get it right. She’s trying to recreate not only the sound but also the speed of the original performance so that the new recording is synchronized with the movement of the lips on the screen. System clicks and streamers can be used to help the actor. Clicks (sometimes called beeps) are a rhythmic sound, like a metronome, that counts down to a certain point when the actor needs to start or hit a particular word. Streamers are a visual reference that follows the same speed of the clicks. The streamer is a solid line across the screen that moves in time with the clicks so you can see when important synchronization events occur. Clicks and streamers are also used in other post-production audio tasks for synchronizing sound effects and music during recording sessions. A click refers to a metronome that the conductor and musicians listen to do keep the music in time with the picture. A streamer is a colored vertical line that moves across the screen over a period of 2 to 4 seconds. When the streamer reaches the end of the screen the music is meant to reach a certain point. For example, the beginning of each measure might need to synchronize with the switch in the camera shot.
8.2.3.2 Mixing
Mixing is the process multiple sounds recorded on different tracks in a DAW are combined, with adjustments made to their relative levels, frequency components, dynamics, and special effects. Then the resulting mix is channeled to different speakers appropriately. The mixing process, hardware, and software were covered in detail in Chapter 7. Thus, we focus here on practical and design considerations that direct the mixing process.
When you sit down to mix a recording you go through a process of trying to balance how you want the recording to sound against the quality of the recording. Often you will be limited in what you’re able to achieve with the mix because the source recording does not allow you sufficient manipulation. For example, if your recording of a band playing a song was recorded using a single overhead microphone, your ability to mix that recording is severely limited because all the instruments, room acoustic, and background noise are on the same track. You can turn the whole thing up or down, EQ and compress the overall recording, and add some reverb, but you have no control over the balance between the different instruments. On the other end of the spectrum you could have a recording with each instrument, voice, and other elements on separate tracks recording with separate microphones that were well-isolated from each other. In this scenario you have quite a bit of control over the mix, but mixing down 48 or more tracks is very time consuming. If you don’t have the time or expertise to harness all of that data, you may be forced to settle for something less than what you envision for the mix. Ultimately, you could work on a mix for the rest of your life and never be completely satisfied. So make sure you have clear goals and priorities for what you want to achieve with the mix and work through each priority until you run out of time or run out of parameters to manipulate.
Mixing sound for film or video can be particularly challenging because there are often quite a few different sounds happening at once. One way of taming the mix is to use surround sound. Mixing the various elements to different loudspeakers separates the sound such that each can be heard in the mix. Voices are typically mixed to the center channel, while music and sound effects are mixed to the four different surround channels. Loudness and dynamics are also an issue that gets close attention in the mixing process. In some cases you may need to meet a specific average loudness level over the course of the entire video. In other cases, you might need to compress the voices but leave the rest of the mix unchanged. The mix engineer will typically create stems (similar to busses or groups) to help with the process, such as a vocal stem, a music stem, and a sound effects stem. These stems can then be manipulated for various delivery mediums. You can see the usefulness of stems in situations where the sound being mixed is destined for one medium – for television broadcast as well as DVD distribution, for example. The audio needs of a television broadcast are very different from the needs of a DVD. If the mix is ultimately going to be adjusted for both of these media, it is much easier to use stems rather returning to the original multitrack source, which may involve several hundred tracks.
8.2.3.3 Mastering
When you’ve completed the mixing process for a recording project, the next step is mastering the mixed-down audio. Mastering is the process of adjusting the dynamics and frequency response of a mix in order to optimize it for listening in various environments and prepare it for storage on the chosen medium. The term mastering comes from the idea of a master copy from which all other copies are made. Mastering is a particularly important step for music destined for CD or DVD, ensuring consistent levels and dynamics from one song to the next in an album.
In some ways you could describe the mastering process as making the mix sound louder. When mixing a multitrack recording, one thing you watch for is clipped signals. Once the mix is completed, you may have a well-balanced mix, but overall the mix sounds quieter than other mixes you hear on commercial recordings. What is typically happening is that you have one instrument in your mix that is a bit more dynamic than the others, and in order to keep the mix from clipping, you have to turn everything down because of this one instrument. One step in the mastering process is to use a multi-band compressor to address this problem.
A multi-band compressor is a set of compressors each of which operates on a limited frequency band without affecting others. A traditional compressor attenuates the entire mix when one frequency exceeds the threshold. A multi-band compressor, on the other hand, attenuates an instrument that is dynamic in one frequency band without attenuating other bands. This is often much more effective than using a simple EQ because the processing is only applied when needed, whereas an EQ will boost or cut a certain range of frequencies all the time. This allows you to let the less-dynamic frequencies take a more prominent role in the mix, resulting in the entire mix sounding louder.
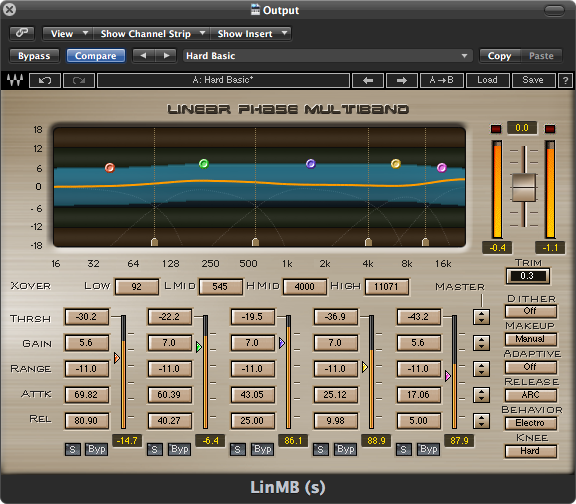
Figure 8.19 shows an example of a multi-band compressor with five separate bands of compression centered on the frequency indicated by the colored dots. You can set a separate threshold, gain, and compression range. In this case, a range is taking place of a ratio. The idea is that you want to compress the frequency band to stay within a given range. As you adjust the gain for each band, that range gets shifted up or down. This has the effect of manipulating the overall frequency response of the track in a way that is responsive to the changing amplitudes of the various frequencies. For example, if the frequency band centered at 1.5 kHz gets suddenly very loud, it can be attenuated for that period of time but then restored when the sound in that band drops back down to a more regular level.
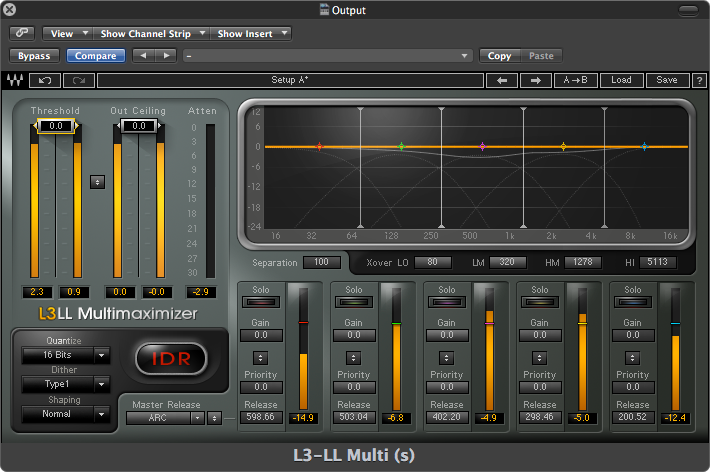
You may also choose to apply some overall EQ in the mastering process to suit your taste. In some cases you may also manipulate the stereo image a bit to widen or narrow the overall stereo effect. You may also want to add a multi-band limiter at the end of the processing chain to catch any stray clipped signals that may have resulted from your other processes. If you’re converting to a lower bit depth, you should also apply a dither process to the mix to account for any quantization errors. For example, CDs require 16-bit samples, but most recording systems use 24 bits. Even if you are not converting bit depth you may still want to use dither since most DAW programs process the audio internally at 32 or 64 bits before returning back the original 24 bits. A 24-bit dither could help you avoid any quantization errors that would occur in that process. Figure 8.20 shows an example of a multi-band limiter that includes a dither processor.