[wpfilebase tag=file id=23 tpl=supplement /]
Sometimes you may find that you want a certain sound that isn’t available in your sampler. In that case, you may want to create your own sample
If you want to create a sampler patch that sounds like a real instrument, the first thing to do is find someone who has the instrument you’re interested in and get them to play different notes one at a time while you record them. To make sure you don’t have to stretch the pitch too far for any one sample, make sure you get a recording for at least three notes per octave within the instrument’s range.
[wpfilebase tag=file id=136 tpl=supplement /]
Keep in mind that the more samples you have, the more RAM space the sampler requires. If you have 500 MB worth of recorded samples and you want to use them all, the sampler is going to use up 500 MB of RAM on your computer. The trick is finding the right balance between having enough samples so that none of them get stretched unnaturally, but not so many that you use up all the RAM in your computer. As long as you have a real person and a real instrument to record, go ahead and get as many samples as you can. It’s much easier to delete the ones you don’t need than to schedule another recording session to get the two notes you forgot to record.Some instruments can sound different depending on how they are played. For example, a trumpet sounds very different with a mute inserted on the horn. If you want your sampler to be able to create the muted sound, you might be able to mimic it using filters in the sampler, but you’ll get better results by just recording the real trumpet with the mute inserted. Then you can program the sampler to play the muted samples instead of the unmuted ones when it receives a certain MIDI command.
Once you have all your samples recorded, you need to edit them and add all the metadata required by the sampler. In order for the sampler to do what it needs to do with the audio files, the files need to be in an uncompressed file format. Usually this is WAV or AIF format. Some samplers have a limit on the sampling rate they can work with. Make sure you convert the samples to the rate required by the sampler before you try to use them.
[wpfilebase tag=file id=137 tpl=supplement /]
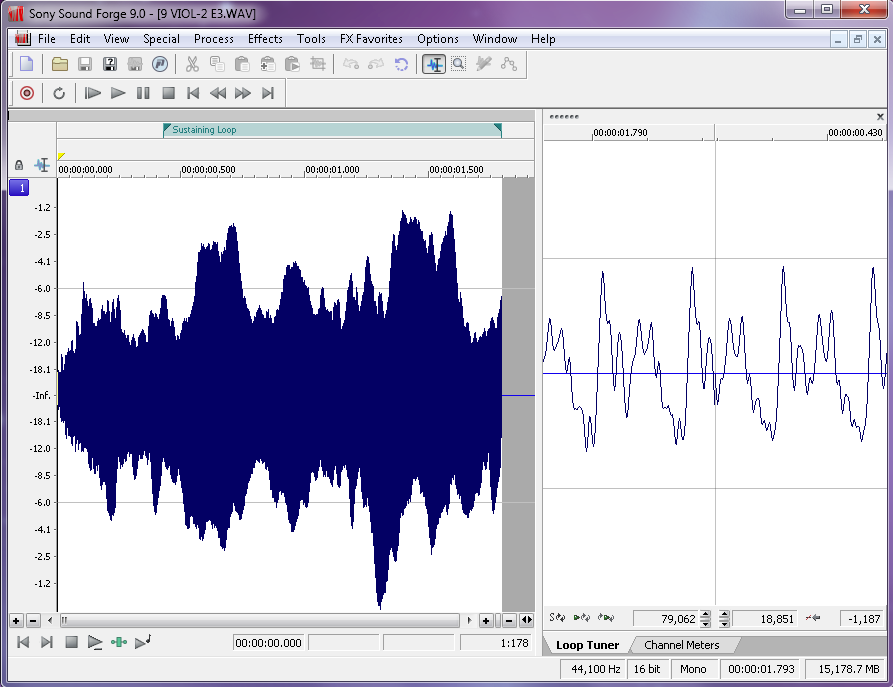
Figure 6.37 shows a loop defined in a sample editing program. On the left side of the screen you can see the overall waveform of the sample, in this case a violin. In the time ruler above the waveform you can see a green bar labeled Sustaining Loop. This is the portion of the sample that is looped. On the right side of the screen you can see a close up view of the loop point. The left half of the wave is the end of the sample, and the right part of the wave is the start of the loop point. The trick here is to line up the loop points so the two parts intersect with the zero amplitude cross point. This way you avoid any clicks or pops that might be introduced when the sampler starts looping the playback.The first bit of metadata you need to add to each sample is a loop start and loop end marker. Because you’re working with prerecorded sounds, the sound doesn’t necessarily keep playing just because you’re still holding the key down on the keyboard. You could just record your samples so they hold on for a long time, but that would use up an unnecessary amount of RAM. Instead, you can tell the sampler to play the file from the beginning and stop playing the file when the key on the keyboard is released. If the key is still down when the sampler reaches the end of the file, the sampler can start playing a small portion of the sample over and over in an endless loop until the note is released. The challenge here is finding a portion of the sample that loops naturally without any clicks or other swells in amplitude or harmonics.
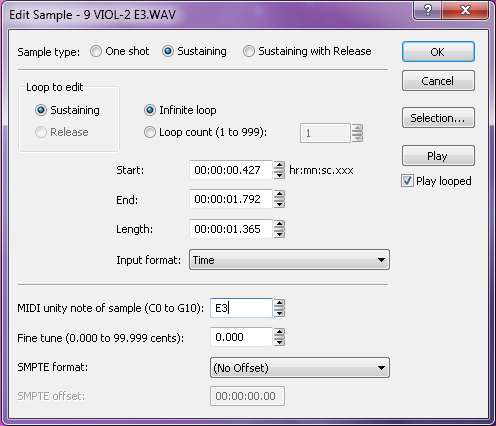
In some sample editors you can also add other metadata that saves you programming time later. For WAV and AIF files, you can add information about the root pitch of the sample and the range of notes this sample should cover. You can also add information about the loop behavior. For example, do you want the sample to continue to loop during the release of the amplitude envelope, or do you want it to start playing through to the end of the file? You could set the sample not to loop at all and instead play as a “one shot” sample. This means the sample ignores Note Off events and play the sample from beginning to end every time. Some samplers can read that metadata and do some pre-programming for you on the sampler when you load the sample.
Once the samples are ready, you can load them into the sampler. If you weren’t able to add the metadata about root key and loop type, you’ll have to add that manually into the sampler for each sample. You’ll also need to decide which notes trigger each sample and which velocities each sample responds to. This process of assigning root keys and key ranges to all your samples is a time consuming but essential process. Figure 6.39 shows a list of sample WAV files loaded in a software sampler. In the figure we have the sample “PianoC43.wav” selected. You can see in the center of the screen the span of keys that have been assigned to that sample. Along the bottom row of the screen you can see the root key, loop, and velocity assignments for that sample.
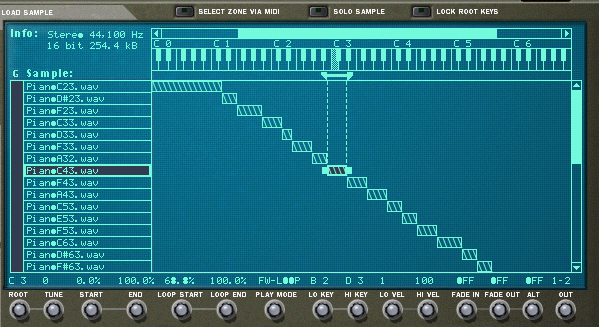
Once you have all your samples loaded and assigned, each sample can be passed through a filter and amplifier which can in turn be modulated using envelopes, LFO, and MIDI controller commands. Most samplers let you group samples together into zones or keygroups allowing you to apply a single set of filters, envelopes, etc. This feature can save a lot of time in programming. Imagine programming all of those settings on each of 100 samples without losing track of how far you are in the process. Figure 6.40 shows all the common synthesizer objects being applied to the “PianoC43.wav” sample.
