In this section, we consider how to set input and output levels properly and how these settings affect dynamic range.
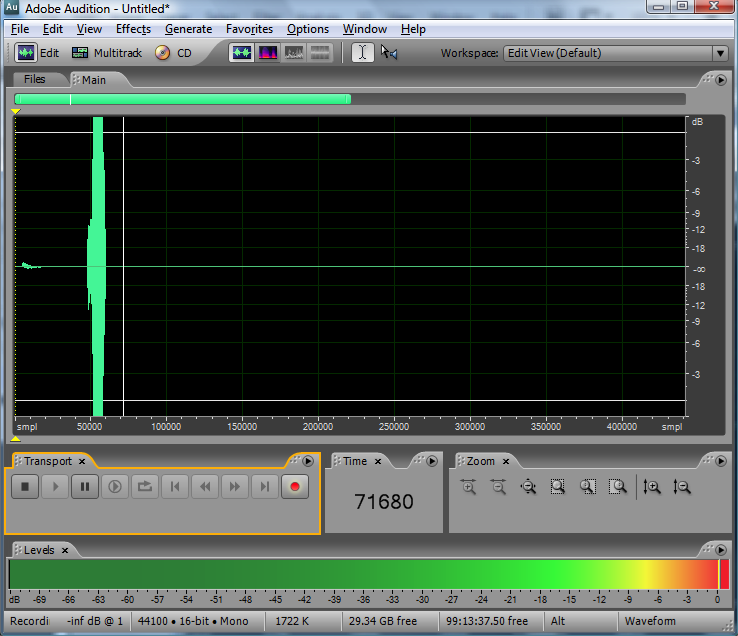
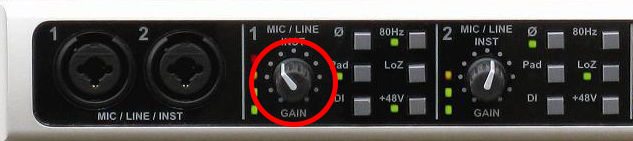
When you get ready to make a digital audio recording or set sound levels for a live performance, you typically test the input level and set it so that your loudest inputs don’t clip. Clipping occurs when the sound level is beyond the maximum input or output voltage level. It manifests itself as unwanted distortion or breaks in the sound. When capturing vocals, you can set the sound levels by asking a singer to sing the loudest note he thinks he’s going to sing in the whole piece, and make sure that the level meter doesn’t hit the limit. Figure 5.21 shows this situation in a software interface. The level meter at the bottom of the figure has hit the right hand side and thus has turned red, indicating that the input level is too high and clipping has occurred. In this case, you need to turn down the input level and test again before recording an actual take. The input level can be changed by a knob on your audio interface or, in the case of some advanced interfaces with digitally controlled analog preamplifiers, by a software interface accessible through your operating system. Figure 5.22 shows the input gain knob on an audio interface.
Let’s look more closely at what’s going on when you set the input level. Any hardware system has a maximum input voltage. When you set the input level for a recording session or live performance, you’re actually adjusting the analog input amplifier for the purpose of ensuring that the loudest sound you intend to capture does not generate a voltage higher than the maximum allowed by the system. However, when you set input levels, there’s no guarantee that the singer won’t sing louder than expected. Also, depending on the kind of sound you’re capturing, you might have transients – short loud bursts of sound like cymbal claps or drum beats – to account for. When setting the input level, you need to save some headroom for these occasional loud sounds. Headroom is loosely defined as the distance between your “usual” maximum amplitude and the amplitude of the loudest sound that can be captured without clipping. Allowing for sufficient headroom obviously involves some guesswork. There’s no guarantee that the singer won’t sing louder than expected, or some unexpectedly loud transients may occur as you record, but you make your best estimate for the input level and adjust later if necessary, though you might lose a good take to clipping if you’re not careful.
Let’s consider the impact that the initial input level setting has on the dynamic range of a recording. Recall from Section 5.1.2.4 that the quietest sound you can capture is relative to the loudest as a function of the bit depth. A 16-bit system provides a dynamic range of approximately 96 dB. This implies that, in the absence of environment noise, the quietest sounds that you can capture are about 96 dB below the loudest sounds you can capture. That 96 dB value is also assuming that you’re able to capture the loudest sound at the exact maximum input amplitude without clipping, but as we know leaving some headroom is a good idea. The quietest sounds that you can capture lie at what is called the noise floor. We could look at the noise floor from two directions, defining it as either the minimum amplitude level that can be captured or the maximum amplitude level of the noise in the system. With no environment or system noise, the noise floor is determined entirely by the bit depth, the only noise being quantization error.
[aside]
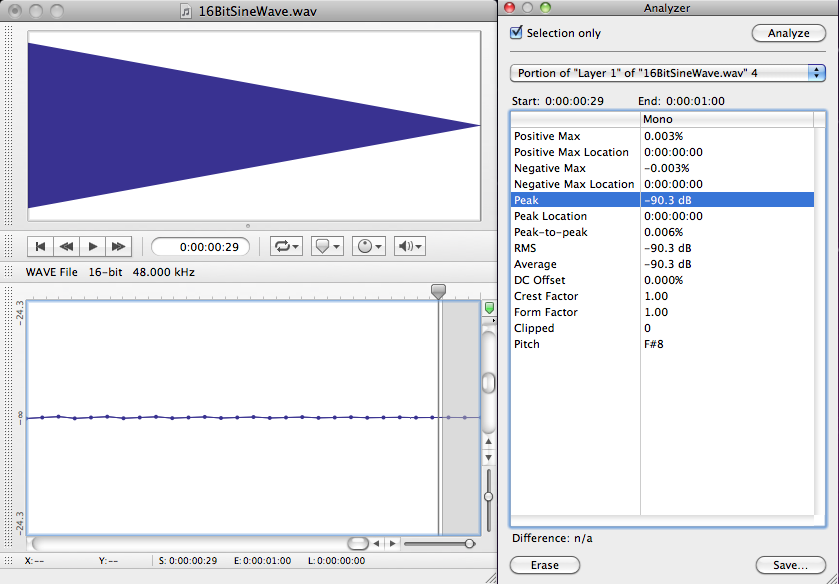
Why is the smallest value for a 16-bit sample -90.3 dB? Because $$20\log_{10}\left ( \frac{1}{32768} \right )=-90.3\: dB$$
[/aside]
In the software interface shown in Figure 5.21, input levels are displayed in decibels-full-scale (dBFS). The audio file shown is a sine wave that starts at maximum amplitude, 0 dBFS, and fades all the way out. (The sine wave is at a high enough frequency that the display of the full timeline renders it as a solid shape, but if you zoom in you see the sine wave shape.) Recall that with dBFS, the maximum amplitude of sound for the given system is 0 dBFS, and increasingly negative numbers refer to increasingly quiet sounds. If you zoom in on this waveform and look at the last few samples (as shown in the bottom portion of Figure 5.23), you can see that the lowest sample values – the ones at the end of the fade – are -90.3 dBFS. This is the noise floor resulting from quantization error for a bit depth of 16 bits. A noise floor of -90.3 dBFS implies that any sound sample that is more than 90.3 dB below the maximum recordable amplitude is recorded as silence.
In reality, there is almost always some real-world noise in a sound capturing system. Every piece of audio hardware makes noise. For example, noise can arise from electrical interference on long audio cables or from less-than-perfect audio detection in microphones. Also, the environment in which you’re capturing the sound will have some level of background noise such as from the air conditioning system. The maximum amplitude of the noise in the environment or the sound-capturing system constitutes the real noise floor. Sounds below this level are masked by the noise. This means that either they’re muddied up with the noise, or you can’t distinguish them at all as part of the desired audio signal. In the presence of significant environmental or system noise during recording, the available dynamic range of a 16-bit recording is the difference between 0 dBFS and the noise floor caused by the environment and system noise. For example, if the noise floor is -70 dBFS, then the dynamic range is 70 dB. (Remember that when you subtract dBFS from dBFS, you get dB.)
So we’ve seen that the bit depth of a recorded audio file puts a fixed limit on the available dynamic range, and that this potential dynamic range can be made smaller by environmental noise. Another thing to be aware of is that you can waste some of the available dynamic range by setting your input levels in a way that leaves more headroom than you need. If you have 96 dB of dynamic range available but it turns out that you use only half of it, you’re squeezing your actual sound levels into a smaller dynamic range than necessary. This results in less accurate quantization than you could have had, and it puts more sounds below the noise floor than would have been there if you had used a greater part of your available dynamic range. Also, if you underuse your available dynamic range, you might run into problems when you try to run any long fades or other processes affecting amplitude, as demonstrated in the practical exercise “Bit Depth and Dynamic Range”linked in this section.
It should be clarified that increasing the input levels also increases any background environmental noise levels captured by a microphone, but can still benefit the signal by boosting it higher above any electronic or quantization noise that occurs downstream in the system. The only way to get better dynamic range over your air conditioner hum is to turn it off or get the microphone closer to the sound you want to record. This increases the level of the sound you want without increasing the level of the background noise.
[wpfilebase tag=file id=22 tpl=supplement /]
So let’s say you’re recording with a bit depth of 16 and you’ve set your input level just about perfectly to use all of that dynamic range possible in your recording. Will you actually be able to get the benefit of this dynamic range when the sound is listened to, considering the range of human hearing, the range of the sound you want to hear, and the background noise level in a likely listening environment? Let’s consider the dynamic range of human hearing first and the dynamic range of the types of things we might want to listen to. Though the human ear can technically handle a sound as loud as 120 dBSPL, such high amplitudes certainly aren’t comfortable to listen to, and if you’re exposed to sound at that level for more than a few minutes, you’ll damage your hearing. The sound in a live concert or dance club rarely exceeds 100 dBSPL, which is pretty loud to most ears. Generally, you can listen to a sound comfortably up to about 85 dBSPL. The quietest thing the human ear can ear is just above 0 dBSPL. The dynamic range between 85 dBSPL and 0 dBSPL is 85 dB. Thus, the 96 dB dynamic range provided by 16-bit recording effectively pushes the noise floor below the threshold of human hearing at a typical listening level.
We haven’t yet considered the noise floor of the listening environment, which is defined as the maximum amplitude of the unwanted background noise in the listening environment. The average home listening environment has a noise floor of around 50 dBSPL. With the dishwasher running and the air conditioner going, that noise floor could get up to 60 dBSPL. In a car (perhaps the most hostile listening environment) you could have a noise floor of 70 dBSPL or higher. Because of this high noise floor, car radio music doesn’t require more than about 25 dB of dynamic range. Does this imply that the recording bit depth should be dropped down to eight bits or even less for music intended to be listened to on the car radio? No, not at all.
Here’s the bottom line. You’ll almost always want to do your recordings in 16 bit sample sizes, and sometimes 24 bits or 32 bits are even better, even though there’s no listening environment on earth (other than maybe an anechoic chamber) that allows you the benefit of the dynamic range these bit depths provide. The reason for the large bit depths has to do with the processing you do on the audio before you put it into its final form. Unfortunately, you don’t always know how loud things will be when you capture them. If you guess low when setting your input level, you could easily get into a situation where most of the audio signal you care about is at the extreme quiet end of your available dynamic range, and fadeouts don’t work well because the signal too quickly fades below the noise floor. In most cases, a simple sound check and a bit of pre-amp tweaking can get you lined up to a place where 16 bits are more than enough. But if you don’t have the time, if you’ll be doing lots of layering and audio processing, or if you just can’t be bothered to figure things out ahead of time, you’ll probably want to use 24 bits. Just keep in mind that the higher the bit depth, the larger the audio files are on your computer.
An issue we’re not considering in this section is applying dynamic range compression as one of the final steps in audio processing. We mentioned that the dynamic range of car radio music’s listening environment is about 25 dB. If you play music that covers a wider dynamic range than 25 dB on a car radio, a lot of the soft parts are going to be drowned out by the noise caused by tire vibrations, air currents, etc. Turning up the volume on the radio isn’t a good solution, because it’s likely that you’ll have to make the loud parts uncomfortably loud in order to hear the quiet parts. In fact, the dynamic range of music prepared for radio play is often compressed after it has been recorded, as one of the last steps in processing. It might also be further compressed by the radio broadcaster. The dynamic range of sound produced for theatre can be handled in the same way, its dynamic range compressed as appropriate for the dynamic range of the theatre listening environment. Dynamic range compression is covered in Chapter 7.